Audacity is a free, cross-platform audio recording software that can be used with Studio123’s microphone set up. There are also several online resources such as the UBC Wiki Cheat Sheet.
Below are a set of instructions that will benefit your editing and production.
If you have questions, feel free to email us at ubcstudios.ok@ubc.ca.
- Launch Audacity: Click on the Audacity icon in the task bar.

- Select Microphone: The podcast microphone (Blue Icicle) should be selected by default, but you can confirm or select another microphone by clicking on the drop down menu next to the microphone icon and above the tracks.
-
- To change the sample rate, adjust the numbers in the bottom left corner. The standard sample rate, 44.1 (or 44100) is used for most consumer audio, whereas 48 kHz is often used in a more professional context such as video. To change the bit rate, go to AUDACITY – PREFERENCES – QUALITY. Audacity automatically defaults to 44100 and 32-bit float (professional), but there may be requests to change it.

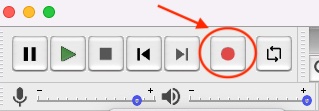
- Record. Click the red circle in the top left corner. As you talk, you should see a waveform move up and down with the sound of your voice
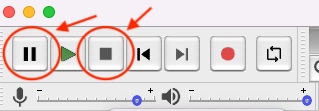
- Pause/Stop recording. To pause your recording, hit pause. This will allow you to resume recording once you are ready to record again. To stop your recording, hit stop.
- Edit track. If you’d like to edit your track, highlight the portions that you’d like to change and then apply your specific changes to that area.
-
- To apply effects, highlight the area that requires effect and click on EFFECT at the top.

- Save the project to your device. By default, Audacity saves to a .aup file. This allows you to take your work to another computer that has the Audacity software and edit form there. To do so, go to FILE > SAVE AS.

- Export to device. If you have finished editing and would like to export and mix down to a compete file, go to FILE – EXPORT. Your choices include wav, mp3, ogg, and other options like exporting only your selected audio rather than the whole track.

Once you log out off the Studio123 computer, your files are wiped from the drive. Be sure to save to the cloud or an external drive.
Still having issues? Feel free to stop by the UBC Studios commons service hub in COM 204 or contact us at ubcstudios.ok@ubc.ca.